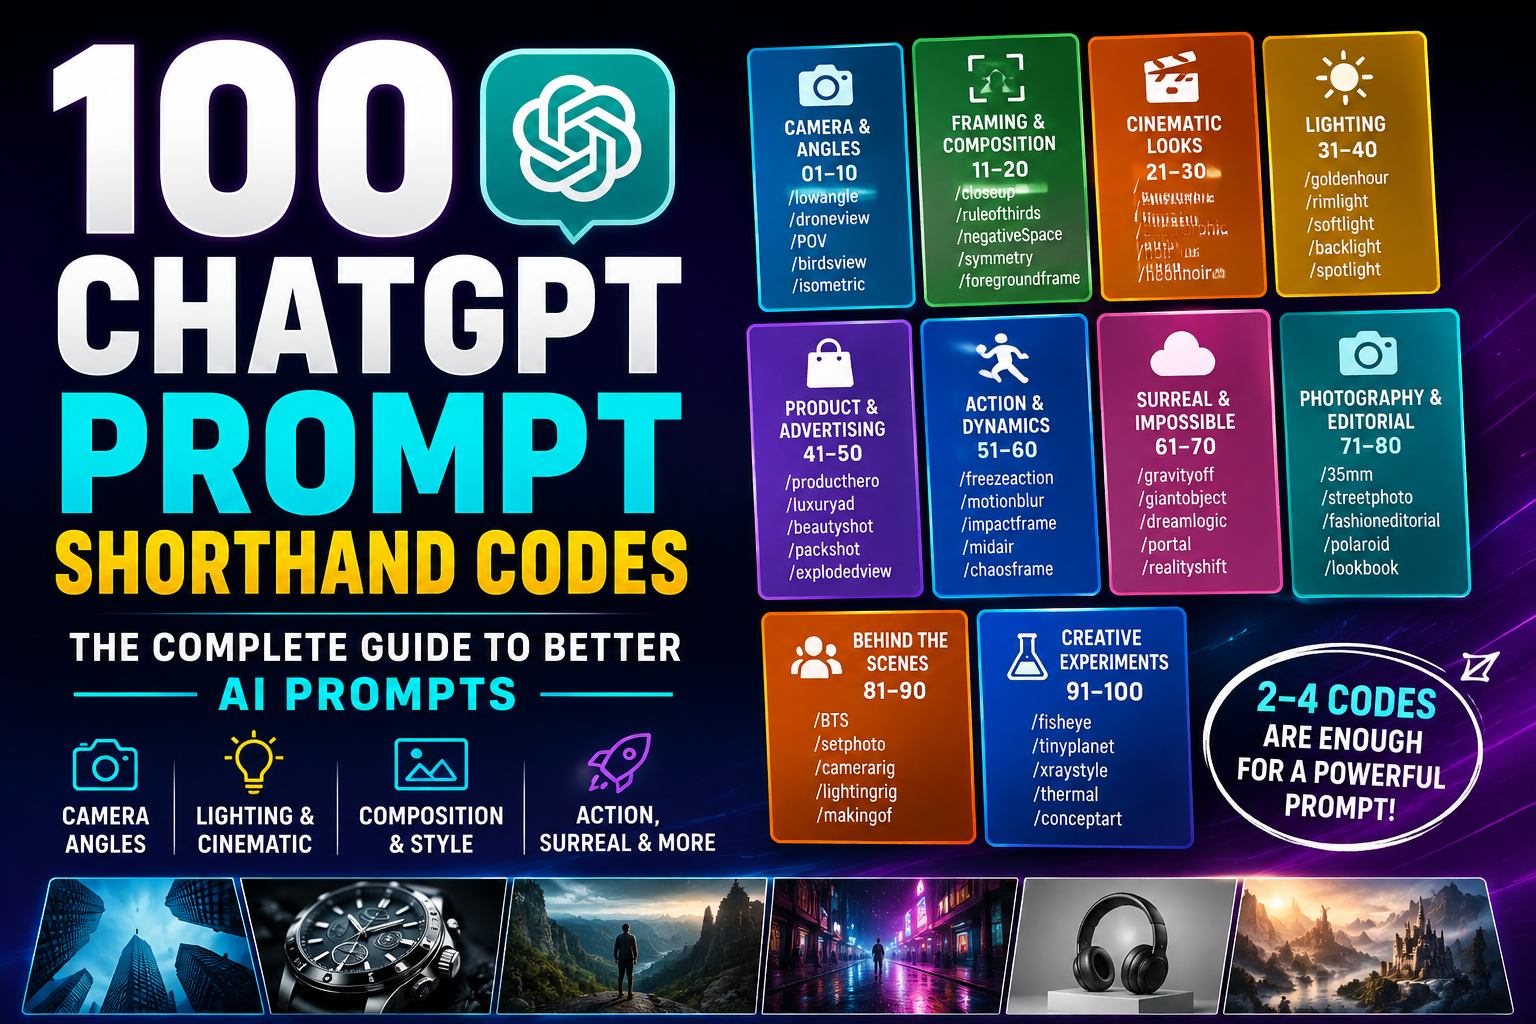
What Are ChatGPT Prompt Shorthand Codes?
Creating an effective AI prompt can sometimes feel like writing a detailed instruction manual. You may need to describe the camera angle, composition, lighting, visual style, product positioning, action, photography technique, and much more.
Prompt shorthand codes are a way of expressing these visual directions more quickly and consistently.

Instead of writing a long instruction such as:
“Place the camera below the character and point it upward to make the character appear powerful and imposing.”
you can use a shorthand such as:
/lowangle
The idea is simple: a short code represents a specific creative or visual direction.
The 100-code swipe file covered in this guide contains shorthand directions organized around different visual decisions, including camera angles, composition, cinematic looks, lighting, advertising, action, surreal concepts, photography, behind-the-scenes imagery, and creative experiments. The source also recommends using only around two to four codes in a prompt rather than attempting to use every code at once.
Important: Are These Official ChatGPT Commands?
No.
These /codes should be understood as creative prompt shorthand, not official ChatGPT slash commands or guaranteed built-in ChatGPT features.
For example:
/cinematic
is not an official ChatGPT command that activates a hidden “cinematic mode.”
Instead, the code can be used as a concise instruction that tells the AI what visual direction you want. For best results, you can also explicitly explain what the shorthand means in your prompt.
How Do Prompt Shorthand Codes Work in ChatGPT?
You can use these codes as part of a larger prompt.
For example:
Create a portrait of a futuristic warrior /lowangle /rimlight /cinematic
Here:
/lowanglecontrols the camera perspective./rimlightcontrols how the subject is illuminated./cinematicestablishes the overall visual treatment.
The AI can interpret these shorthand terms as creative directions.
However, there is an important distinction between a shorthand code and an instruction.
For maximum consistency, especially when using an unfamiliar AI model, you can write:
Create a cinematic portrait of a futuristic warrior. Use a low-angle camera, strong rim lighting, and a polished cinematic movie-still aesthetic.
Or you can use the shorthand version:
Create a futuristic warrior portrait /lowangle /rimlight /cinematic
The first version is more explicit. The second version is faster and more compact.
Why Use Prompt Shorthand?
Prompt shorthand can make your workflow faster, particularly when you’re creating many AI images or experimenting with different visual styles.
1. Faster Prompt Creation
Instead of repeatedly writing lengthy camera and lighting instructions, you can use a short shorthand.
2. Easier Prompt Experimentation
You can quickly swap one creative direction for another.
For example:
/lowangle
can become:
/highangle
to change the visual perspective.
3. Better Organization
The codes are grouped according to the visual decision they influence, making it easier to build prompts systematically.
4. Useful for AI Image Generation
Many of these directions are particularly useful for image-generation workflows involving characters, products, cinematic scenes, advertisements, concept art, and photography.
5. Helpful for Prompt Templates
You can build reusable templates where the subject stays the same while the visual codes change.
For example:
A futuristic city at night /droneview /neonnoir /reflection
can become:
A futuristic city at night /birdsview /noir /silhouette
The subject remains similar, but the visual direction changes dramatically.
The Complete List of 100 Prompt Shorthand Codes
The following 100 codes are organized into ten categories.
Camera and Angles: Codes 01–10
Camera direction determines where the viewer appears to be positioned relative to the subject.
01. /lowangle
Places the camera below the subject, making the subject appear larger, stronger, more imposing, or powerful.
Example:Hero standing in a futuristic city /lowangle
02. /highangle
Places the camera above the subject and looks downward, which can emphasize vulnerability, patterns, or the scale of the environment.
Example:A lone child standing in a massive empty street /highangle
03. /eyelevel
Uses a natural eye-height perspective for believable and balanced proportions.
Example:Portrait of a young entrepreneur /eyelevel
04. /dutchangle
Tilts the horizon to create uneasiness, instability, movement, or editorial energy.
Example:Detective entering a mysterious warehouse /dutchangle
05. /OTS
Means an over-the-shoulder perspective. The camera looks across a person’s shoulder toward the subject.
Example:Detective looking at a suspect /OTS
06. /POV
Creates a first-person point of view, showing the scene as if the viewer is experiencing it directly.
Example:Walking through an ancient temple /POV
07. /wormsview
Uses an extremely low ground-level viewpoint looking sharply upward.
Example:Massive skyscraper towering above the viewer /wormsview
08. /birdsview
Looks almost directly downward from above, revealing layouts, patterns, geometry, and context.
Example:Busy Indian marketplace /birdsview
09. /droneview
Creates an aerial perspective emphasizing distance, terrain, and spatial scale.
Example:Mountain village surrounded by forests /droneview
10. /isometric
Uses a structured three-quarter view that reveals multiple planes of an object or environment.
Example:Modern smart home interior /isometric
Framing and Composition: Codes 11–20
These codes determine how the subject is positioned and framed within the image.
11. /closeup
Tightly frames a face, object, texture, or important detail.
Example:Emotional character portrait /closeup
12. /extremecloseup
Moves extremely close to a tiny feature so that it becomes the primary subject.
Example:Human eye reflecting a futuristic city /extremecloseup
13. /mediumshot
Generally frames the subject around the waist or chest upward.
Example:Businessman presenting a new product /mediumshot
14. /fullbody
Shows the complete subject with space around the silhouette.
Example:Warrior wearing futuristic armor /fullbody
15. /wideframe
Shows the subject together with a broad view of its surroundings.
Example:Explorer standing in an enormous desert /wideframe
16. /symmetry
Creates visual balance by distributing visual weight around the centerline.
Example:Luxury hotel entrance /symmetry
17. /centerframe
Places the main subject directly in the center for an iconic or poster-like composition.
Example:Superhero standing in the middle of a destroyed city /centerframe
18. /ruleofthirds
Positions the focal subject near a rule-of-thirds intersection for an editorial composition.
Example:Photographer standing beside a mountain /ruleofthirds
19. /negativeSpace
Leaves substantial empty space around the main subject.
This can be especially useful for advertisements, website banners, thumbnails, and images where text will later be added.
Example:Luxury perfume bottle /negativeSpace
20. /foregroundframe
Uses nearby objects to frame the main subject and create layered depth.
Example:Ancient castle viewed through tree branches /foregroundframe
Cinematic Looks: Codes 21–30
These codes help establish an overall movie-like or film-inspired visual treatment.
21. /cinematic
Creates a polished movie-still appearance with intentional lighting, depth, and framing.
Example:A detective walking through a rainy city /cinematic
22. /filmstill
Creates the appearance of a frame captured from a lived-in film scene, including subtle realistic imperfections.
23. /anamorphic
Suggests widescreen lens characteristics, shallow depth of field, and restrained horizontal lens flare.
24. /imax
Suggests large-format visual scale, immersive detail, and dramatic perspective.
25. /noir
Uses monochrome contrast, deep shadows, and a tense crime-film atmosphere.
26. /neonnoir
Combines dark cinematic environments with saturated neon lighting and reflections.
27. /vintagefilm
Adds analog grain, gentle halation, soft contrast, and nostalgic color characteristics.
28. /70scinema
Creates a warm, textured 1970s-inspired cinematic palette and period lens character.
29. /80saction
Uses bold contrast, atmospheric haze, and heroic action-film framing.
30. /indiefilm
Favors intimate, naturalistic imagery with understated lighting and composition.
Lighting: Codes 31–40
Lighting can completely change the mood and appearance of an AI-generated image.
31. /goldenhour
Uses warm low-angle sunlight, soft highlights, and long directional shadows.
32. /bluehour
Creates a cool twilight atmosphere occurring around sunrise or sunset.
33. /hardlight
Produces crisp directional lighting with sharp-edged shadows.
34. /softlight
Uses broad, diffused illumination with smooth transitions and flattering detail.
35. /rimlight
Places light around the edge of the subject to separate it from the background.
36. /backlight
Places the primary light behind the subject, creating glow, depth, or a silhouette effect.
37. /silhouette
Exposes the scene for the background so the subject appears primarily as a dark shape.
38. /chiaroscuro
Creates dramatic contrast between light and shadow, inspired by traditional painting techniques.
39. /spotlight
Isolates the main subject with a narrow theatrical pool of light.
40. /practicallight
Uses visible light sources such as lamps, screens, signs, and fixtures as part of the lighting design.
Product and Advertising: Codes 41–50
These shorthand codes are particularly useful when creating product photography, advertisements, ecommerce imagery, and promotional visuals.
41. /producthero
Makes the product the most important and visually dominant element.
42. /luxuryad
Creates a premium advertising aesthetic using restrained composition, immaculate surfaces, and polished presentation.
43. /applestyle
Uses minimal staging, generous space, and refined visual hierarchy.
44. /billboard
Creates an instantly readable composition designed to communicate one strong idea from a distance.
45. /editorialad
Combines fashion-magazine sophistication with a strong commercial focal point.
46. /beautyshot
Emphasizes form, finish, surface quality, and polished presentation.
47. /floatingproduct
Suspends the product in clean space while maintaining believable controlled shadows.
48. /macroproduct
Moves extremely close to the product to reveal material, texture, and craftsmanship.
49. /explodedview
Separates product components in space while showing how they relate to the assembled product.
50. /packshot
Creates a clean studio product photograph suitable for catalogs and ecommerce stores.
Action and Dynamics: Codes 51–60
These codes are useful when you want an image to communicate movement, speed, impact, or energy.
51. /freezeaction
Captures a rapid moment with crisp detail and decisive timing.
52. /motionblur
Adds directional motion blur while keeping the main subject recognizable.
53. /speedramp
Suggests a stylized slow-fast-slow action beat within a single visual moment.
54. /midair
Captures the subject at a suspended peak moment.
55. /impactframe
Shows the exact instant of impact with debris, force, and concentrated energy.
56. /windblown
Uses wind to animate hair, clothing, smoke, dust, or other loose elements.
57. /runningframe
Creates a convincing sprinting pose with perspective and environmental motion.
58. /jumpcutframe
Creates an abrupt and surprising visual beat with editorial discontinuity.
59. /collision
Shows multiple elements converging in a dramatic moment.
60. /chaosframe
Creates a visually dense composition containing multiple readable events and high energy.
Surreal and Impossible: Codes 61–70
These codes are designed for imaginative scenes that go beyond normal physical reality.
61. /impossibleangle
Uses a viewpoint that a conventional physical camera could not normally reach.
62. /gravityoff
Creates a world where people and objects naturally float without gravity.
63. /giantobject
Turns an ordinary object into a monumental element within the environment.
64. /miniworld
Creates a tiny believable world around or inside the primary subject.
65. /mirrorworld
Creates an alternate reflected reality with its own consistent visual rules.
66. /dreamlogic
Connects unlikely elements into a surreal but visually coherent scene.
67. /infinite
Repeats or extends an element into an apparently endless environment.
68. /portal
Creates a visually credible passage connecting two different locations or environments.
69. /scaleillusion
Manipulates perspective so familiar objects appear gigantic or miniature.
70. /realityshift
Merges incompatible environments into one convincing photographic world.
Photography and Editorial: Codes 71–80
These codes can help emulate different photographic approaches and editorial aesthetics.
71. /fashioneditorial
Uses deliberate styling, attitude, and high-fashion magazine composition.
72. /streetphoto
Creates a candid documentary-style moment with authentic environmental imperfections.
73. /paparazzi
Uses direct flash, spontaneous framing, and an unpolished celebrity-photography feel.
74. /polaroid
Emulates instant-film characteristics with soft contrast, grain, and casual framing.
75. /35mm
Uses classic 35mm photographic characteristics, including grain and realistic lens behavior.
76. /mediumformat
Creates detailed imagery with smooth tonality and strong subject separation.
77. /disposablecam
Adds consumer-camera flash, imperfect exposure, and nostalgic spontaneity.
78. /contactsheet
Arranges multiple related photographic frames into one coherent contact-sheet composition.
79. /lookbook
Presents fashion consistently using clean poses, styling, and repeatable framing.
80. /coverstory
Creates a magazine-ready portrait with strong visual hierarchy and space for cover lines.
Behind the Scenes: Codes 81–90
These codes are useful when you want to show the production environment behind an image or film.
81. /BTS
Shows the finished subject together with the production environment.
82. /behindthescenes
Reveals crew, cameras, lighting, props, and the surrounding production space.
83. /setphoto
Places the subject inside a recognizable professional photo or film set.
84. /camerarig
Includes camera equipment, lens, support, monitor, and working rig.
85. /lightingrig
Shows softboxes, flags, stands, practical lights, cables, and lighting modifiers.
86. /directorview
Frames the action from the practical position where a director might observe the production.
87. /videovillage
Shows monitors and crew reviewing the live or recorded image.
88. /studiofloor
Uses a wide view showing an active photography or film studio.
89. /beforeafter
Compares a raw production setup with the polished final result.
90. /makingof
Creates a cinematic documentary-style view focused on the craft behind the image.
Creative Experiments: Codes 91–100
The final ten codes are designed for unusual visual treatments and experimental imagery.
91. /fisheye
Uses extreme wide-angle distortion for an energetic and unconventional composition.
92. /tinyplanet
Wraps the environment into a spherical miniature-planet composition.
93. /reflection
Builds the image around mirrors, water, glass, or polished reflective surfaces.
94. /throughglass
Creates a view through glass with reflections, refraction, and layered depth.
95. /underwater
Creates a submerged perspective with water particles, underwater lighting, and believable water behavior.
96. /xraystyle
Reveals internal structures through a stylized transparent visualization.
97. /thermal
Uses a thermal-camera-inspired color treatment to represent apparent temperature.
98. /blueprint
Presents the subject as a structured technical drawing or blueprint.
99. /cutaway
Removes part of an object or environment to reveal its internal construction.
100. /conceptart
Creates polished cinematic concept art while retaining credible photographic detail.
How to Use These 100 Codes in ChatGPT Prompts
The easiest approach is to think of a prompt as a combination of several creative layers.
A useful structure is:
Subject + Scene + Camera + Composition + Lighting + Style
You don’t need to use every layer every time.
For example:
A futuristic warrior standing on a rooftop at night /lowangle /rimlight /cinematic
Here, the prompt contains:
Subject: futuristic warrior
Scene: rooftop at night
Camera: /lowangle
Lighting: /rimlight
Overall look: /cinematic
This creates a much more specific visual direction than simply writing:
A futuristic warrior
The 2–4 Code Rule
One of the most important ideas in the codebook is that you don’t need to use all 100 codes in a single prompt.
The source specifically describes these as creative shorthand and recommends using approximately two to four codes in a prompt.
For example:
Simple Prompt
A luxury watch on a black surface
Improved Prompt
A luxury watch on a black surface /macroproduct /spotlight /luxuryad
The three codes establish:
/macroproduct→ close product detail/spotlight→ focused lighting/luxuryad→ premium advertising aesthetic
This gives the AI a clear visual direction without making the prompt unnecessarily complicated.
Example ChatGPT Prompts Using the Shorthand Codes
Example 1: Cinematic Character
Create a powerful medieval warrior standing outside a castle at sunset /lowangle /rimlight /cinematic
Example 2: Horror Scene
A mysterious abandoned hospital at midnight /dutchangle /noir /hardlight
Example 3: Product Advertisement
Premium wireless headphones floating in a clean studio environment /floatingproduct /beautyshot /luxuryad
Example 4: Social Media Fashion Image
Young fashion model walking through a modern city /fashioneditorial /35mm /streetphoto
Example 5: Surreal AI Image
A giant coffee cup becoming a miniature city with tiny people living inside it /giantobject /miniworld /dreamlogic
Example 6: Fantasy Landscape
A magical castle floating above the clouds /droneview /goldenhour /conceptart
Example 7: Technical Illustration
Detailed modern smartphone showing its internal components /explodedview /blueprint /cutaway
Example 8: Dramatic Action Scene
Superhero jumping between skyscrapers during an explosion /midair /impactframe /motionblur
How to Combine Multiple Shorthand Codes
The best combinations usually come from different categories.
For example:
Camera + Lighting + Cinematic Style
/lowangle + /rimlight + /cinematic
Composition + Photography + Style
/ruleofthirds + /35mm + /streetphoto
Product + Lighting + Advertising
/producthero + /softlight + /luxuryad
Surreal + Camera + Lighting
/impossibleangle + /backlight + /dreamlogic
Action + Camera + Cinematic
/freezeaction + /lowangle + /cinematic
This is generally more useful than combining several codes that all attempt to control the same visual property.
A Simple Prompt Formula You Can Reuse
You can create a reusable prompt template like this:
Create [SUBJECT] in [ENVIRONMENT]. Use [CAMERA CODE], [LIGHTING CODE], and [STYLE CODE]. Add realistic details, strong composition, and high visual quality.
For example:
Create a futuristic Indian city in the rain. Use /droneview, /neonnoir, and /reflection. Add realistic environmental details, cinematic depth, and atmospheric lighting.
This approach allows you to create hundreds of different prompt combinations from the same framework.
Can You Use These Codes in Normal ChatGPT Text Prompts?
Yes, you can include them in ordinary ChatGPT prompts as shorthand instructions.
For example:
Write a visual prompt for a superhero poster /centerframe /symmetry /billboard
ChatGPT can interpret the codes as creative directions and incorporate their intended meaning into the final prompt.
However, remember that these codes are not guaranteed system-level commands. Their effectiveness can depend on the AI model, the task, and how clearly the surrounding prompt explains what you want.
For important or highly specific generations, it is often better to combine the shorthand with natural-language instructions.
Shorthand vs. Natural Language: Which Is Better?
Neither approach is universally better.
Shorthand is useful when:
- You create prompts frequently.
- You are experimenting with many visual variations.
- You have a reusable prompt workflow.
- You want to quickly swap camera or lighting directions.
- You are building prompt templates.
Natural language is better when:
- You need extremely precise instructions.
- The AI doesn’t understand a particular shorthand.
- The scene contains complicated relationships between objects.
- You need exact positioning or behavior.
- You are working with a model that does not recognize the shorthand.
The Best Approach: Combine Both
Instead of relying exclusively on codes, use them alongside descriptive instructions.
For example:
A cinematic portrait of a mysterious detective in a rainy alley /lowangle /rimlight /noir. Keep the face partially hidden in shadow, with wet pavement reflecting distant street lights.
This provides both quick visual shorthand and explicit creative direction.
100 Codes at a Glance
| # | Code | Main Purpose |
|---|---|---|
| 01 | /lowangle | Powerful low camera |
| 02 | /highangle | Overhead perspective |
| 03 | /eyelevel | Natural eye-level view |
| 04 | /dutchangle | Tilted horizon |
| 05 | /OTS | Over-the-shoulder |
| 06 | /POV | First-person view |
| 07 | /wormsview | Extreme low angle |
| 08 | /birdsview | Top-down view |
| 09 | /droneview | Aerial perspective |
| 10 | /isometric | Structured 3/4 view |
| 11 | /closeup | Tight framing |
| 12 | /extremecloseup | Extreme detail |
| 13 | /mediumshot | Waist/chest framing |
| 14 | /fullbody | Complete subject |
| 15 | /wideframe | Broad environment |
| 16 | /symmetry | Balanced composition |
| 17 | /centerframe | Centered subject |
| 18 | /ruleofthirds | Editorial balance |
| 19 | /negativeSpace | Empty space |
| 20 | /foregroundframe | Layered depth |
| 21 | /cinematic | Movie-still aesthetic |
| 22 | /filmstill | Film-frame realism |
| 23 | /anamorphic | Widescreen lens feel |
| 24 | /imax | Large-format scale |
| 25 | /noir | Dark monochrome mood |
| 26 | /neonnoir | Neon cinematic style |
| 27 | /vintagefilm | Analog film aesthetic |
| 28 | /70scinema | 1970s cinema |
| 29 | /80saction | 1980s action aesthetic |
| 30 | /indiefilm | Naturalistic film style |
| 31 | /goldenhour | Warm sunset lighting |
| 32 | /bluehour | Cool twilight |
| 33 | /hardlight | Sharp shadows |
| 34 | /softlight | Diffused lighting |
| 35 | /rimlight | Edge lighting |
| 36 | /backlight | Light from behind |
| 37 | /silhouette | Dark subject shape |
| 38 | /chiaroscuro | Dramatic light/shadow |
| 39 | /spotlight | Focused lighting |
| 40 | /practicallight | Visible light sources |
| 41 | /producthero | Product focus |
| 42 | /luxuryad | Premium advertising |
| 43 | /applestyle | Minimal product design |
| 44 | /billboard | High-impact advertising |
| 45 | /editorialad | Fashion-commercial style |
| 46 | /beautyshot | Polished product detail |
| 47 | /floatingproduct | Floating product |
| 48 | /macroproduct | Product macro detail |
| 49 | /explodedview | Separated components |
| 50 | /packshot | Studio product image |
| 51 | /freezeaction | Frozen movement |
| 52 | /motionblur | Motion effect |
| 53 | /speedramp | Stylized speed |
| 54 | /midair | Suspended action |
| 55 | /impactframe | Moment of impact |
| 56 | /windblown | Wind movement |
| 57 | /runningframe | Running action |
| 58 | /jumpcutframe | Editorial jump |
| 59 | /collision | Collision moment |
| 60 | /chaosframe | Dense action |
| 61 | /impossibleangle | Impossible viewpoint |
| 62 | /gravityoff | Zero-gravity world |
| 63 | /giantobject | Oversized object |
| 64 | /miniworld | Miniature world |
| 65 | /mirrorworld | Alternate reflection |
| 66 | /dreamlogic | Surreal connections |
| 67 | /infinite | Endless repetition |
| 68 | /portal | Connected worlds |
| 69 | /scaleillusion | Perspective illusion |
| 70 | /realityshift | Mixed realities |
| 71 | /fashioneditorial | Fashion photography |
| 72 | /streetphoto | Street photography |
| 73 | /paparazzi | Celebrity-photo style |
| 74 | /polaroid | Instant-film look |
| 75 | /35mm | 35mm photography |
| 76 | /mediumformat | Detailed photography |
| 77 | /disposablecam | Disposable-camera style |
| 78 | /contactsheet | Multiple frames |
| 79 | /lookbook | Fashion presentation |
| 80 | /coverstory | Magazine cover style |
| 81 | /BTS | Behind-the-scenes |
| 82 | /behindthescenes | Production environment |
| 83 | /setphoto | Professional set |
| 84 | /camerarig | Camera equipment |
| 85 | /lightingrig | Lighting equipment |
| 86 | /directorview | Director perspective |
| 87 | /videovillage | Monitor/crew setup |
| 88 | /studiofloor | Studio environment |
| 89 | /beforeafter | Raw vs final |
| 90 | /makingof | Production documentary |
| 91 | /fisheye | Wide-angle distortion |
| 92 | /tinyplanet | Planet composition |
| 93 | /reflection | Reflective surfaces |
| 94 | /throughglass | Glass perspective |
| 95 | /underwater | Submerged view |
| 96 | /xraystyle | Internal visualization |
| 97 | /thermal | Thermal-camera look |
| 98 | /blueprint | Technical drawing |
| 99 | /cutaway | Interior view |
| 100 | /conceptart | Cinematic concept art |
Tips for Getting Better Results With Prompt Codes
1. Don’t Overload Your Prompt
Using every code simultaneously can create conflicting visual instructions.
Start with two or three codes and increase complexity only when necessary.
2. Combine Different Categories
A camera code + lighting code + style code is often a useful combination.
For example:
/lowangle /goldenhour /cinematic
3. Describe the Subject Clearly
Codes control the visual treatment, but they don’t replace the need to explain what you actually want.
Instead of:
/cinematic /lowangle /rimlight
write:
A heroic astronaut standing on Mars /cinematic /lowangle /rimlight
4. Experiment With One Variable at a Time
If you’re trying to discover which direction works best, keep the subject identical and change only one code.
For example:
Version A: /lowangle
Version B: /highangle
Version C: /droneview
This makes visual comparison much easier.
5. Use Natural Language for Critical Details
If something is particularly important, don’t rely solely on shorthand.
Explicitly describe the position, expression, environment, colors, objects, lighting direction, and other critical requirements.
Frequently Asked Questions
What are ChatGPT prompt shorthand codes?
ChatGPT prompt shorthand codes are compact creative instructions used to represent visual directions such as camera angles, composition, lighting, cinematic styles, photography techniques, and advertising treatments.
Are these official ChatGPT commands?
No. These are creative shorthand codes, not official ChatGPT slash commands. Their interpretation can vary depending on the AI model and the surrounding prompt.
How many prompt codes should I use?
A good starting point is two to four codes per prompt. The source codebook specifically recommends this range rather than trying to use all 100 at once.
Can I use these codes for AI image generation?
Yes. Many of the codes are specifically designed around visual concepts such as camera position, composition, lighting, photography, product advertising, action, and surreal imagery.
Can I use /cinematic in ChatGPT?
You can include /cinematic as creative shorthand in a prompt. However, it should not be confused with an official ChatGPT command. For greater reliability, you can also explain the intended cinematic characteristics in natural language.
Which prompt codes are best for cinematic images?
Some useful combinations include:
/cinematic + /lowangle + /rimlight
or
/filmstill + /anamorphic + /goldenhour
The best combination depends on the subject and the visual result you want.
Which codes are useful for product photography?
Useful choices include:
/producthero/luxuryad/beautyshot/floatingproduct/macroproduct/explodedview/packshot
Which codes are useful for photography?
You can experiment with:
/streetphoto/35mm/mediumformat/polaroid/disposablecam/fashioneditorial/lookbook/coverstory
Can these prompt codes improve ChatGPT responses?
They can make your instructions more concise and structured, especially when you’re using them as creative shorthand. However, they are not magic commands and don’t guarantee a specific output.
Should I use shorthand codes instead of detailed prompts?
Not necessarily. The most reliable approach is often to combine shorthand with clear natural-language instructions.
Can I create my own prompt shorthand codes?
Yes. You can create a personal prompt library by assigning memorable shorthand labels to recurring instructions. When working with AI, however, it is useful to define what your custom code means so the model can interpret it consistently.
Final Thoughts
Prompt engineering doesn’t always have to mean writing extremely long instructions.
A well-designed shorthand system can help you think about prompts in terms of camera, composition, lighting, style, action, environment, and creative direction.
The 100 codes in this guide provide a structured visual vocabulary covering everything from /lowangle and /closeup to /cinematic, /goldenhour, /producthero, /motionblur, /dreamlogic, /35mm, /BTS, /fisheye, and /conceptart.
The key is not to use more codes—it is to use the right codes.
Start with two or three visual directions, describe your subject clearly, and then experiment with different combinations until you find the look you want.
Whether you’re creating AI images, advertisements, YouTube thumbnails, cinematic scenes, product visuals, concept art, or photography prompts, these shorthand directions can become a useful part of your personal prompt-writing toolkit.